1. Installation
Follow the instructions according to your browser on how to install extensions. You can install the eyeWnder browser extension using one of the following links according to your browser:
2. Accessing Extension Popup Window
When the browser extension is successfully installed, you will get the eyeWnder icon at the right top corner of your browser window. The icon is highlighted in a red circle in this screenshot at the left side of this text.
The icon can be clicked to give you access to the popup window of the extension . Furthermore, the icon is also annotated with the number of detected advertisement in the currently selected window tab.
3. Extension Popup Window Options
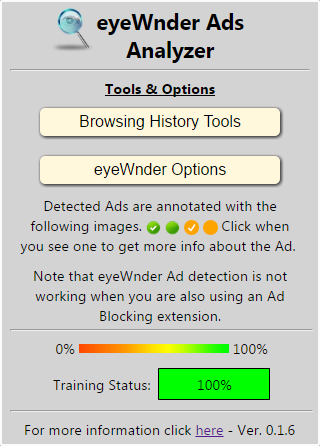
The screenshot at the right side of this text shows the popup window of the extension. From here the user can access the "Browsing History tool" (See below) and the options menu (See below).
At the bottom of the popup window you can locate the "Training Status" of the extension. When the number of visited domains is low, the training status will be red with low percentage indication. When enough domains are visited the training status will be green and the status percentage 100%, similar to the screenshot. When is ready (Green color), means that the extension has enough information to give more accurate feedback about your browsing habits and interests using the Browsing History Tool.
4. Extension Options Window
The extension options menu allows the user to customise the extension behavior and also fill up his demographic information. Next we provide a short description for each available option and information: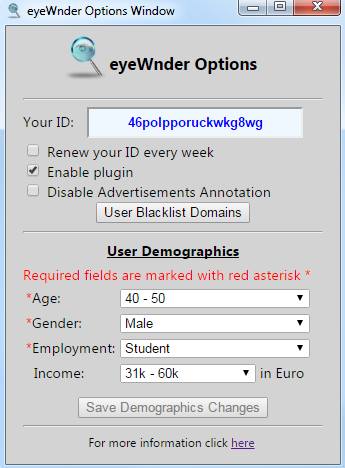
- Your ID: Your current extension ID.
- Renew your ID every week: Check this checkbox if you want to have your Id renewed every
7 days.
- Enable plugin: When this checkbox is unchecked the plugin is not collecting any
advertisements nor providing any advertisements information to the user.
- Disable Advertisements Annotation: When this checkbox is checked the plugin is
not annotating the detected ads with the circular icons at the top right corner
(See below).
- User Blacklist Domains Button: The user can also set a number of domains that want to disable
the eyeWnder browser extension from detecting and collecting the advertisements. To do so, the user can click on
this button to access the corresponding interface. For more details (see below).
The 'User Demographics' section allows the user to input his demographic information. The first 3 fields (Age, Gender and Employment) are required to be able to get aggregate results from the back-end analysis of the advertisements. The income field is optional.
- Age: The user age.
- Gender: The user gender.
- Employment: The user current employment status.
- Income: The user income in Euro (Approximately).
After selecting the appropriate values from the dropdown list of each option click the 'Save Demographics Changes' button under the income dropdown to save your changes. Note that the save button is activated only if you have at least one option of you demographics changed. Note that these anonymous information are required to allow the extension to provide aggregated demographic information about the advertisements that you see. If the required demographics fields are not provide the extension will show the options menu to the users periodically until they do so. Furthermore, the extension will not be able to provide any advertisement analysis results.
5. Users Custom Restricted Domains
The extension allows the user to declare a list of domains that wants to block the eyeWnder extension from detecting and collecting advertisements for any personal reason if the user wants to do so. In this section we explain how the user can add, remove and inspect the restricted domains list.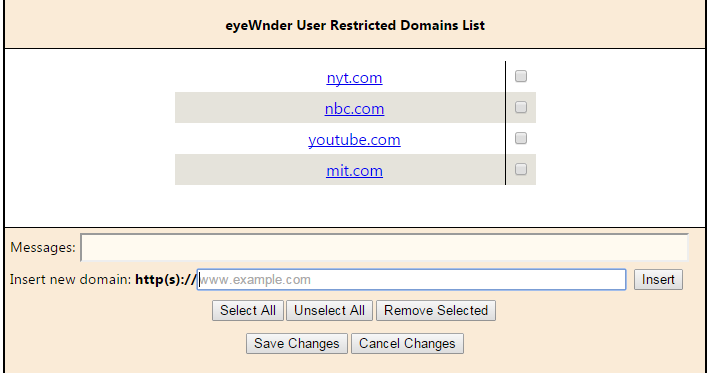 The center white area on the above screenshot present the list of restricted domains (if any). In our screenshot
example above, the user already added 4 domains in his list (nyt.com, nbc.com, youtube.com and mit.com). The bottom
area of the screenshot is the actual user interface that the user can interact with to manipulate the list.
The center white area on the above screenshot present the list of restricted domains (if any). In our screenshot
example above, the user already added 4 domains in his list (nyt.com, nbc.com, youtube.com and mit.com). The bottom
area of the screenshot is the actual user interface that the user can interact with to manipulate the list.- Messages: The area that different messages are presented to the user during his interaction with the interface.
- Insert new domain: The input area that the user can write the domain name to that wants to insert to the list.
- Insert: The insert button located at the right side of the "Insert new domain" input. The user can click on this button to append the domain that is currently available in the "Insert new domain" input line.
- Select All: The user can use this button to select all domain entries of the list. Note that the user has the option to select individual domains from the list by clicking at the check box at the right side of each domain.
- Unselect All: The user can use this button to un select any selected domain from the domains entry list.
- Remove Selected: The user can use this button to remove any selected domains entries from the list.
- Save Changes: At the end of the session the user needs to click on this button to save his changes.
- Cancel Changes: At any time the user can click on this button to revert his changes.
6. Extension Functionality and Advertisements Annotation
The extension is able to detect advertisements in the different websites that the user is visiting and provide different type of information about the detected advertisements in real time. The following screenshot shows the extension in action.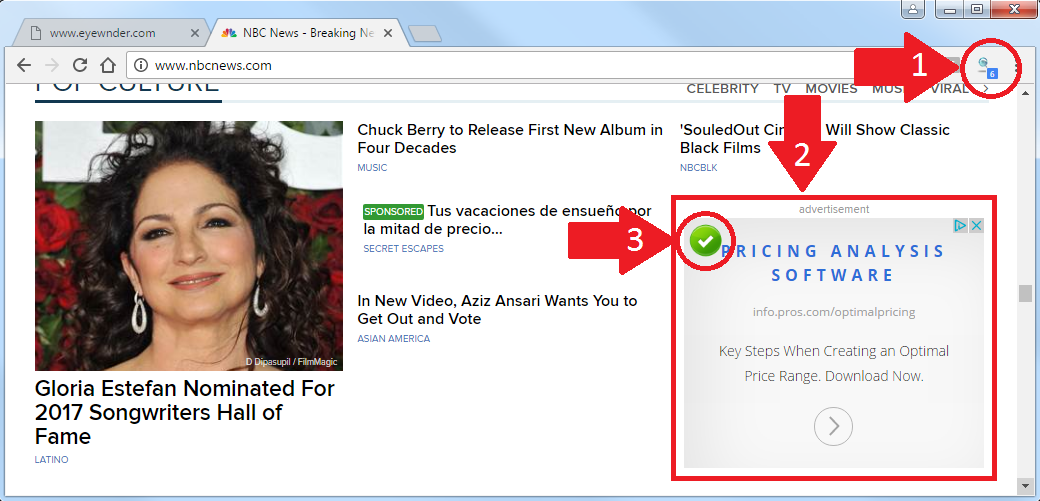 - Arrow No.1: When the visited website is fully loaded in the user's browser the eyeWnder icon is
annotated with the number of detected advertisements in the current focused window tab of the browser.
- Arrow No.1: When the visited website is fully loaded in the user's browser the eyeWnder icon is
annotated with the number of detected advertisements in the current focused window tab of the browser.- Arrow No.2: Arrow No.2 gives an example of a web advertisement in a website.
- Arrow No.3: Upon successful advertisement detection the extension is annotating the advertisement with a small image circle* to notify the user that more information are available for the specific advertisement. The extension uses four different types of image circles to annotate the advertisements as follow:
 The advertisement is located inside an
iFrame and the
landing page of the advertisement is
detected.
The advertisement is located inside an
iFrame and the
landing page of the advertisement is
detected.
 The advertisement is located inside an iFrame but the landing page of the advertisement is NOT detected.
 The advertisement is located inside the main content of the website and the landing page is detected.
 The advertisement is located inside the main content of the website but the landing page is NOT detected.
* This functionality is only available if the required demographic information are provided by the user.
7. Checking Advertisements Results
By clicking on any of the four different types of the annotation images presented above the user can access the advertisement information results popup window.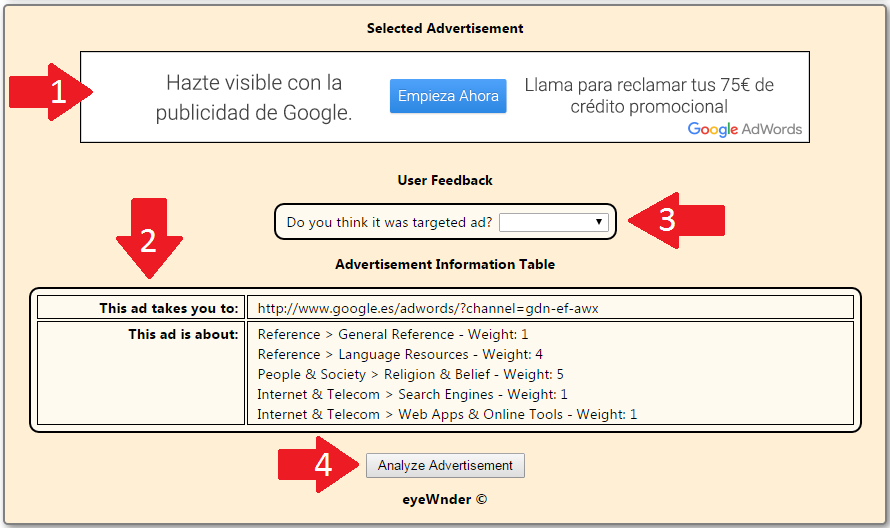 The above screenshot shows the initial results of the popup window. Next we will provide more details for each
field of the initial results:
The above screenshot shows the initial results of the popup window. Next we will provide more details for each
field of the initial results:- Selected Advertisement: (Arrow No.1) At the very top of the result window you can see a thumbnail of the selected advertisement. Note that in some cases the extension may fail to get the thumbnail.
- Advertisement Information Table: (Arrow No.2) The table provide the initial information of the advertisement. The "This ad takes you to" field provide the destination URL of the advertisement if the eyeWnder extension manage to detect it without clicking on the advertisement otherwise the field is populated with the string "Not detected". The "This ad is about" field provides information about the interest topics of the advertisement. If the destination URL of the advertisement is not detected by the eyeWnder extension this field will be populated with the string "Data not found".
- User Feedback: (Arrow No.3) The user can provide his feedback about the selected advertisement by selecting some predefined options provided by the dropdown list.
- Analyze Advertisement: (Arrow No.4) The "Analyze Advertisement" button allows the user to request the aggregated results for the specific advertisement. When the button is pressed the extension is requesting more information about the selected advertisement from the centralized backend database. When the request is done the results will be appended to the bottom of the information table.
8. Advertisement Aggregated Demographics Results
Upon receiving the aggregated data from the backend database the extension replace the loading animation image with the received results. This section provide a short description on some of these results.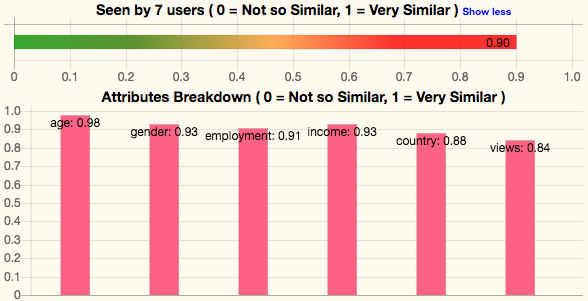 The first graph depict the similarity score of the current user compared to all the other users of the eyeWdner that
have seen the same advertisement. High value indicates high similarity between the users.
The first graph depict the similarity score of the current user compared to all the other users of the eyeWdner that
have seen the same advertisement. High value indicates high similarity between the users.
 The second graph depict the top 10 domains (if exists) that other users of the extension has seen the same
advertisement.
The second graph depict the top 10 domains (if exists) that other users of the extension has seen the same
advertisement.
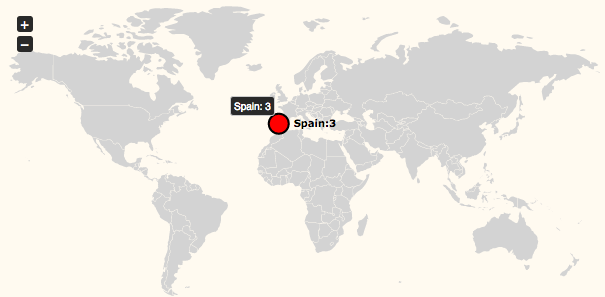 The third graph depict the total number of the advertisement impressions per country in the last 7 days.
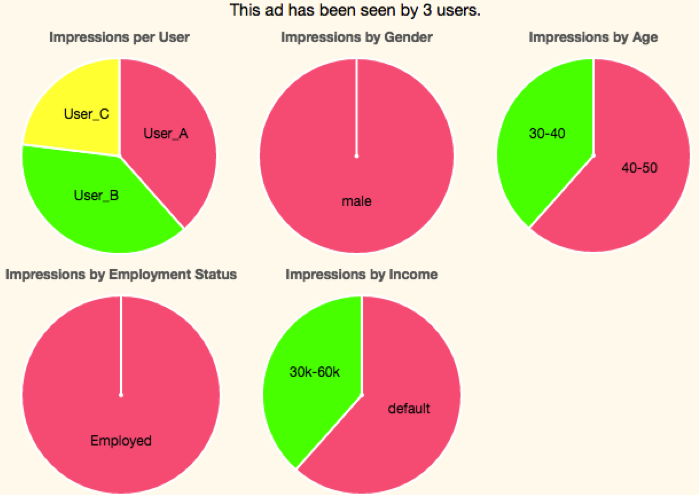 The forth graph shows the statistics of the demographics attributes of the users that have seen the same
advertisement on the last 7 days along side the total number of impressions per user. The demographic attributes
are, (a) the gender, (b) the age, (c) the employment status and (d) the user income.
The forth graph shows the statistics of the demographics attributes of the users that have seen the same
advertisement on the last 7 days along side the total number of impressions per user. The demographic attributes
are, (a) the gender, (b) the age, (c) the employment status and (d) the user income.
For each of the above graphs, if no information is available the corresponding field will populated with the string "Data not found". Note that the availability of these information is heavily depends on users' demographics donations, thus, we encourage users to provide their demographics. All demographics are collected anonymously and cannot be linked with the real identity of the user.
9. Browsing History Tool
The Browsing History Tool allows the user to interact with his browsing history and identify interest topics relations between his visited domains. Furthermore, the user can identify his top interest topics based on how he browse the web. The tool can help the user to understand why specific advertisement are served to him. In this section we provide more information about this tool. topics default view.")
- 1. Common Topics Filtering: The user can use the "Common Topics Filtering" slide bar (Fig.1 - Red arrow No.1) to filter out the top common topics among the other eyeWnder users.
- 2. Two Levels of Topics Hierarchy: Currently the topics are arrange in two hierarchical
levels, "Level 1" and "Level 2". Using the "Radio Buttons" (Fig.1 Red arrow No.2), the user can switch between
the two hierarchical topic levels.
The hierarchy is presented in the following form "Level 1 Topic > Level 2 Topic" i.e "News > Sports News" where "News" is the level 1 topic that includes the level 2 topic "Sports News". - 3. Mouse Scroll Zooming: The user can use the mouse scroll wheel to zoom in/out the word cloud and graphs by hovering the mouse pointer on top and scroll up or down.
-
Topics Level 1 Mode:
- Clicking on a Level 1 Topic Word: The user can click on any topic word to see more information in the "Selected Node Info" box (The blue box at the bottom left corner of Fig.1).
- Double Clicking on a Level 1 Topic Word: The user can also double click on any word to get a popup window with a new word cloud that present the Level 2 Topics under the selected Level 1 Topic (See Fig.2).
-

Figure 2: The level 2 topics popup word cloud appears when the user double click on any level 1 topic word. -
Topics Level 2 Mode:
- Clicking on a Level 2 Topic Word: The user can click on any topic word to see more information in the "Selected Node Info" box (The blue box at the bottom left corner of Fig.1).
- Double Clicking on a Level 2 Topic Word: The user can double click on any level 2 topic
word to get a new popup graph that present the domains related with the selected topic word (See Fig.3).
Note that the same functionality is available when the user double click on a level 1 topic word and then from the new popup level 2 word cloud double click again on any level 2 topic word (See Fig.2).
-

Figure 3: The related domains popup graph appears when the user double click on any level 2 topic word.
